Sim racing cockpits (or sim racing rigs) can completely change how your racing games feel. When I moved from a simple wheel clamped to a desk to a proper cockpit, it honestly felt like I had unlocked a new “difficulty level” in realism and control. In this guide, I’ll walk you through everything I know about sim racing rigs, from beginner-friendly setups to advanced, future-proof cockpits — without pushing any specific products.
What Is a Sim Racing Cockpit?
A sim racing cockpit, or sim racing rig, is a dedicated frame that holds your steering wheel, pedals, seat, and sometimes shifters, handbrakes, and monitors. Instead of clamping your wheel to a shaky desk, you bolt it to a solid frame designed for racing.
The main goal is simple: create a stable, comfortable, and realistic driving position so you can focus on racing instead of fighting with your hardware.
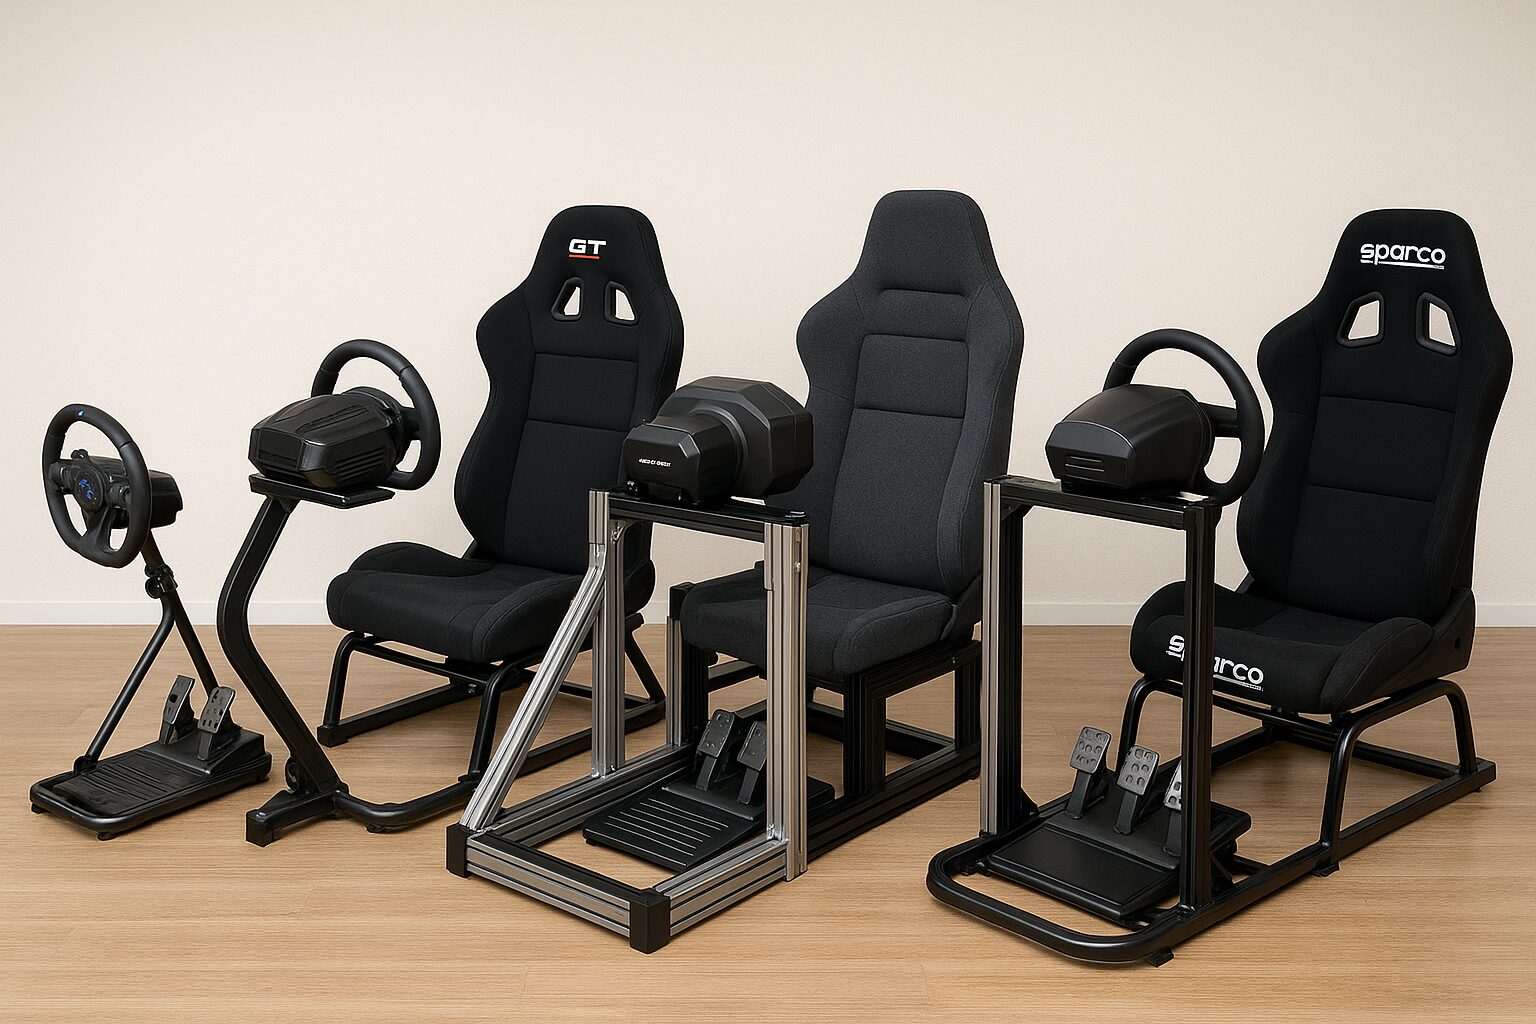
There are a few common setups:
- Wheel stands: Just a stand for the wheel and sometimes pedals. No seat included.
- Foldable cockpits: Compact rigs with a minimalist frame and basic seat, easy to store.
- Full cockpits: Integrated frame + seat, designed to be a permanent setup.
- Aluminum profile rigs (8020): Very rigid, modular frames made from aluminum extrusion.
- Motion rigs: Rigs with actuators that simulate movement, bumps, and braking forces.
If you are just starting out, this can feel like a lot. So I like to think in three levels: Beginner, Intermediate, and Advanced. Each level has different expectations, budgets, and priorities.
Why a Sim Racing Cockpit Actually Matters
Before we dive into levels and brands, I want to explain why a dedicated cockpit is worth considering.
- Stability: A strong rig stops your wheel from shaking or loosening when force feedback kicks in. This is crucial if you’re using belt-drive or direct-drive wheels.
- Consistency: When your seat, wheel, and pedals stay in exactly the same position every time, your muscle memory improves. Braking points and steering inputs become more precise.
- Comfort: Long endurance races can be tough. A cockpit with a proper seat, good posture, and the right angles can save your back, neck, and legs.
- Immersion: Sitting in a race-style seat with a fixed wheel in front of you feels dramatically more “real” than sitting at an office desk.
- Upgrade path: A good cockpit can stay with you even as you upgrade from entry-level wheels to powerful direct-drive wheelbases and load cell pedals.
In short, a cockpit is the foundation. You can swap wheels and pedals in the future, but the rig is the frame that holds everything together.
Buying Levels: Beginner, Intermediate, Advanced
To make this easier to follow, I’ll break things down into three buyer levels. As you read, try to place yourself in one of these categories based on your budget, interest level, and long-term plans.
Beginner Level – Small Budget, Big Curiosity
If you’re just starting sim racing, you might already have a basic wheel like a Logitech or entry-level Thrustmaster. At this level, your goal is to escape the “wobbly desk” problem without spending more on the rig than on the wheel itself.
Typical budget: Around $120–$300 (for the frame, not including the wheel and pedals).
Common options at this level include:
- Wheel stands: Compact, foldable stands that hold your wheel and pedals. You use your existing chair or sofa.
- Basic foldable cockpits: Light frames with a simple racing-style seat and mounted wheel/pedal platform.
Materials you’ll usually see:
- Steel tubing with bolt-on joints
- Lightweight frames designed to be portable and easy to store
Pros at beginner level:
- Affordable way to get away from the desk
- Easy storage — many stands and rigs can fold
- Plenty of compatibility with popular entry-level wheels
Cons at beginner level:
- More flex (movement in the frame) when force feedback is strong
- Less adjustability for seat position, pedal angle, and wheel height
- Often not ideal if you plan to upgrade to heavy, powerful hardware
At this stage, I’d focus on stability vs price. You don’t need perfection, but you do want something that doesn’t feel flimsy or annoying after a few weeks.
Intermediate Level – More Serious About Racing
If you’ve been racing for a while and you know this hobby is sticking around, the intermediate level is where things get exciting. You might be using a stronger wheelbase, better pedals, and starting to value comfort and adjustability more than just “having a rig.”
Typical budget: Around $300–$700 for the cockpit.
What usually changes at this level:
- More solid frames with less flex, often made from thicker steel
- Integrated seat or the ability to mount a proper racing seat
- More adjustability for:
- Seat distance and height
- Wheel height and angle
- Pedal distance and angle
- Shifter and handbrake positions
Intermediate rigs are great for belt-drive wheels or mid-range wheelbases, and they start to handle load cell pedal sets much better than beginner rigs. You can also find rigs that support both GT-style seating (more upright) and more Formula-style (reclined, feet higher) positions.
At this level, I recommend paying attention to:
- Adjustability: Can you really fine-tune your driving position?
- Seat quality: A good seat makes a huge difference in long races.
- Peripheral mounts: Check if it supports shifters, handbrakes, and monitor stands.
If you already know you’re hooked on sim racing, this is a very comfortable level to aim for.
Advanced Level – High-End and Future-Proof
This is where things get serious. If you’re using or planning a direct-drive wheel, high-end pedals, triple screens, and maybe even motion, you’ll want a rig that can handle everything without flexing or limiting your upgrade path.
Typical budget: Around $800–$2,000+ for the rig alone.
What you’ll usually find at this level:
- Aluminum profile (8020) rigs: Modular, extremely rigid frames built from aluminum extrusion.
- High-strength steel cockpits: Chassis designed for powerful wheels and full setups.
- Motion-ready platforms: Frames designed to be paired with motion actuators.
- Serious seat options: Fixed-back bucket seats, GT-style seats, and rally-inspired seating positions.
At this level, you’re not just buying a rig; you’re building a platform for years of upgrades. You can add monitor mounts, side mounts, keyboard trays, motion systems, and tactile transducers (bass shakers) as your budget allows.
I would focus on three words here: rigidity, modularity, and expandability.
- Rigidity: The rig must not flex under strong force feedback or heavy braking.
- Modularity: You can move parts around, add brackets, and adjust everything.
- Expandability: You can mount more equipment as your setup grows.
If you know sim racing is a long-term passion and you want to avoid “upgrading rigs” every year, going straight to an advanced cockpit can actually save money in the long run.
Types of Sim Racing Rigs
Let me organize the main types of rigs in a way that’s easy to compare:
- Wheel Stands:
- Only holds the wheel and pedals.
- Works well if you have limited space.
- Best suited for beginners or casual use.
- Foldable Cockpits:
- Integrated seat and frame that folds for storage.
- Perfect for living rooms or shared spaces.
- Good compromise between immersion and space-saving.
- Steel Tube Full Rigs:
- Stronger, more stable frames.
- Usually more adjustability than foldable options.
- Great for intermediate setups and some advanced users.
- Hybrid Formula/GT Rigs:
- Allow multiple seating positions (GT, Formula, sometimes Rally).
- Great if you enjoy different car types and want flexibility.
- Aluminum Profile (8020) Rigs:
- Very rigid and highly customizable.
- Excellent for direct-drive wheels and high-end pedals.
- Ideal for advanced users who want full control over layout.
- Motion Rigs:
- Use actuators or platforms to simulate movement and forces.
- Most expensive and complex option.
- Usually built on top of a solid rig, not as a first purchase.
Popular Sim Racing Cockpit Brands (No Specific Models)
Without naming specific products, I can still mention some popular brands you’ll often see when shopping for rigs:
- Playseat: Known for foldable and integrated seat cockpits, often aimed at console and casual users.
- Next Level Racing: Offers a wide range from entry-level stands to more advanced cockpits and motion platforms.
- Trak Racer: Focuses heavily on strong, multipurpose rigs including steel and aluminum options.
- GT Omega: Popular for solid mid-range rigs and comfortable seats.
- RSEAT: Known for premium cockpits with stylish designs and strong build quality.
- Sim-Lab: Very popular in the advanced community for aluminum profile rigs and professional features.
- MOZA, Fanatec, Logitech, Thrustmaster: These brands mainly make wheel and pedal hardware, but some also offer basic stands or cockpit solutions.
Each brand tends to target specific segments of the market. When I research a rig, I like to pay attention to user reviews, photos of real setups, and feedback about flex, comfort, and assembly quality.
Materials & Build Quality Guide
The material of the frame has a huge impact on how the cockpit feels.
Steel Tube Frames
Steel rigs are very common and can range from light and flexible to very heavy and strong.
- Pros: Affordable, strong enough for most users, widely available.
- Cons: Some designs can flex, especially with powerful wheels or heavy braking.
Aluminum Profile (8020) Frames
These rigs use aluminum extrusion with channels where you can mount brackets almost anywhere.
- Pros: Extremely rigid, highly customizable, great for high-end setups.
- Cons: Usually more expensive, and assembly can feel like building industrial shelving.
Seats
Seats can be just as important as the frame:
- GT-style seats: More upright, comfortable for general racing and longer sessions.
- Bucket seats: Fixed back, good lateral support, more “race car” feel.
- Reclinable seats: Allow you to adjust back angle like a road car seat.
Personally, I prefer something with good lumbar support and enough padding for long races. A cool-looking seat that hurts after 30 minutes is not worth it.
Essential Features to Consider (Buyer’s Checklist)
When I evaluate a cockpit, I go through a mental checklist. You can use this same list when you compare rigs:
- Rigidity: Does the wheel deck move when you apply strong force feedback? Does the pedal deck flex when you brake hard?
- Seat Comfort: Can you sit for an hour or two without back pain?
- Adjustability: Can you adjust the wheel height, distance, and angle? What about pedals and seat?
- Shifter & Handbrake Mounting: If you use an H-shifter or handbrake, can the rig hold them in a realistic position?
- Monitor Mounting: Does the rig support a single monitor or triple screens, or will you use a separate stand?
- Upgrade Path: Can this rig handle stronger wheels and better pedals later on?
- Compatibility: Check that your wheel and pedals can be mounted directly (Logitech, Thrustmaster, Fanatec, MOZA, etc.).
- Footprint: Measure how much space the rig needs and compare it to your room size.
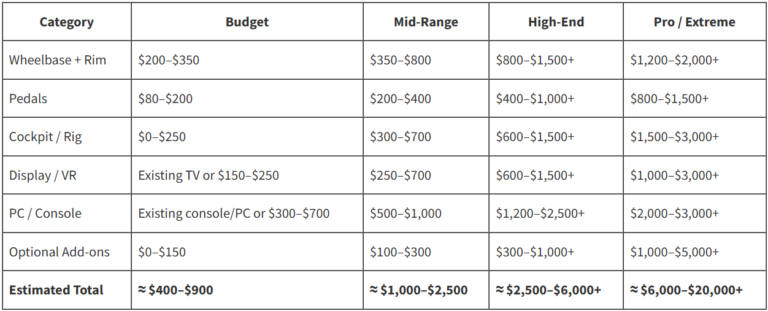
Price Range Breakdown
Let’s break prices into rough ranges so you can match your expectations.
- Under $200:
- Wheel stands and very basic foldable rigs.
- Good for beginners and tight spaces.
- $250–$600:
- Most mid-range integrated rigs with seats.
- Better adjustability and stability.
- $600–$1,200:
- Solid steel frames and many aluminum profile rigs.
- Excellent balance for serious sim racers.
- $1,200+:
- High-end aluminum rigs, motion-ready frames, premium seats.
- Best suited to advanced users with powerful hardware.
Instead of chasing the most expensive option, I like to zoom out and ask: “What level of rig actually matches my hardware and my goals?” You don’t need a professional race team rig if you’re just driving casually once a week.
Room Size & Space Planning
Space is often the biggest constraint, especially if you’re sharing a living room or bedroom.
Here’s how I think about it:
- Wheel stand: Best if you need to store everything away between sessions.
- Foldable cockpit: Great if you have a small room but can dedicate some space when racing.
- Full cockpit: Works best in a dedicated corner or separate room.
Don’t forget to plan:
- Space around the rig for getting in and out.
- Monitor distance from your eyes.
- Cable paths so you don’t trip or strain connectors.
- Room for VR play area if you use a VR headset.
Wheel & Pedal Compatibility
Before buying any cockpit, I always double-check hardware compatibility.
- Entry-level wheels (Logitech, basic Thrustmaster): Most rigs can handle these without a problem, even cheaper ones.
- Belt-drive wheels and load cell pedals: Look for stronger pedal decks and wheel plates with multiple mounting points.
- Direct-drive wheels: These can produce very strong forces. I recommend a high-quality steel rig or aluminum profile frame so you don’t waste the potential of the wheel.
Check the mounting patterns (hole positions) of your wheelbase and pedals, and make sure the rig lists them as compatible. It’s a small detail that can save a big headache later.
Best Use Cases by Driver Type
To make this even more practical, let me map rig types to the kind of sim racer you might be:
- Casual Gamer:
- Wheel stand or simple foldable cockpit.
- Keep it easy to store and quick to set up.
- Sim Racing Beginner:
- Entry-level cockpit with basic adjustability.
- Focus on comfort and enough stability to enjoy force feedback.
- Intermediate Racer (iRacing, ACC, etc.):
- Mid-range rig with a stronger frame and proper racing seat.
- Great if you race multiple nights a week.
- Competitive / League Racer:
- Aluminum profile or high-end steel cockpit.
- Designed for direct-drive wheels and performance pedals.
- Drift & Rally Fan:
- Rig with solid handbrake and shifter mounts.
- Consider cockpits that support more upright rally seating.
- VR User:
- Any level of rig, but make sure there’s enough space around and a stable seat that doesn’t move when you turn your head.
- Motion Enthusiast:
- Very rigid cockpit designed to integrate motion platforms.
Pros & Cons Summary by Rig Type
Here’s a quick overview of what you gain and lose with different rig styles.
- Wheel Stands
- Pros: Cheap, very compact, easy to store.
- Cons: No seat, more flex, less immersive.
- Foldable Rigs
- Pros: Integrated seat, better immersion, still somewhat portable.
- Cons: Not as rigid as full cockpits, limited adjustability.
- Steel Full Cockpits
- Pros: Stable, good value, versatile layouts.
- Cons: Heavier, may have some flex with high-end hardware.
- Aluminum Profile Rigs
- Pros: Extremely rigid, modular, highly customizable.
- Cons: Higher price, more complex assembly.
- Motion Rigs
- Pros: Maximum immersion, realistic motion feedback.
- Cons: Very expensive, technically complex, needs strong base rig.
Setup Tips & Ergonomics
Even the best rig needs proper setup. I always take time to dial in my driving position because it directly affects control and comfort.
- Wheel Height: Your hands should rest comfortably at about 9 and 3 o’clock, with slightly bent elbows.
- Pedal Distance: Your legs should not be fully locked out. Keep a slight bend in your knees at full brake.
- Seat Position: For GT style, sit more upright; for Formula style, recline more with feet raised.
- Pedal Angle: Adjust the angle so you can apply consistent pressure without ankle strain.
- Shifter & Handbrake: Place them within natural reach, similar to a real car layout.
A little time spent fine-tuning ergonomics now will save you a lot of discomfort later.
Common Mistakes to Avoid
I’ve seen (and made) plenty of mistakes when choosing and setting up rigs. Here are some to avoid:
- Buying the cheapest rig blindly: Sometimes it’s better to save a bit longer for a more solid frame instead of dealing with flex and frustration.
- Ignoring future plans: If you already know you want a direct-drive wheel, consider buying a rig that can handle it from the start.
- Underestimating space: Always measure your area and check the rig dimensions with a bit of extra room around it.
- Skipping comfort: A rigid rig with an uncomfortable seat is not a good long-term solution.
- Not checking compatibility: Make sure your wheel, pedals, shifter, and monitors can actually mount to the rig.
Conclusion
Choosing the right sim racing cockpit is all about matching your setup, your budget, and your long-term goals. A beginner can start with a simple wheel stand or foldable rig and still enjoy a big upgrade over racing at a desk. An intermediate sim racer can step up to stronger frames, better seats, and more adjustability. Advanced users can invest in aluminum profile rigs and motion-ready platforms that support powerful direct-drive wheels and high-end pedals for years.
Personally, I see the cockpit as the “chassis” of my sim racing journey. Hardware will come and go, but a well-chosen rig can stay in your setup for a very long time. If you take the time to think about your level (beginner, medium, or advanced), consider your space, and plan for future upgrades, you’ll end up with a sim racing cockpit that makes every lap more immersive, comfortable, and enjoyable.

Hi, I’m Peter Edwards, a lifelong sim racing enthusiast, tech tinkerer, and automotive geek with a passion for making virtual racing feel as real as possible. I’ve spent years testing steering wheels, pedals, and full cockpit rigs—from entry-level gear to pro-grade setups—to help others build immersive, affordable racing experiences at home.
When I’m not tightening bolts on my rig or tuning force feedback curves, you’ll find me comparing telemetry data, exploring new racing titles, or helping fellow racers fine-tune their setups. My goal is to share honest, experience-based insights that help every driver—from casual weekend racers to aspiring eSports pros—get faster, smoother, and more connected to the track.
I write for SimRacingEnthusiast.com, where I share deep-dive reviews, setup guides, and honest opinions on the latest in the sim racing world.